My Tasks
This is the nerve centre of PDCA Complete. On this screen you view and manage all of the tasks that have been generated from the other parts of the system that are related to you.
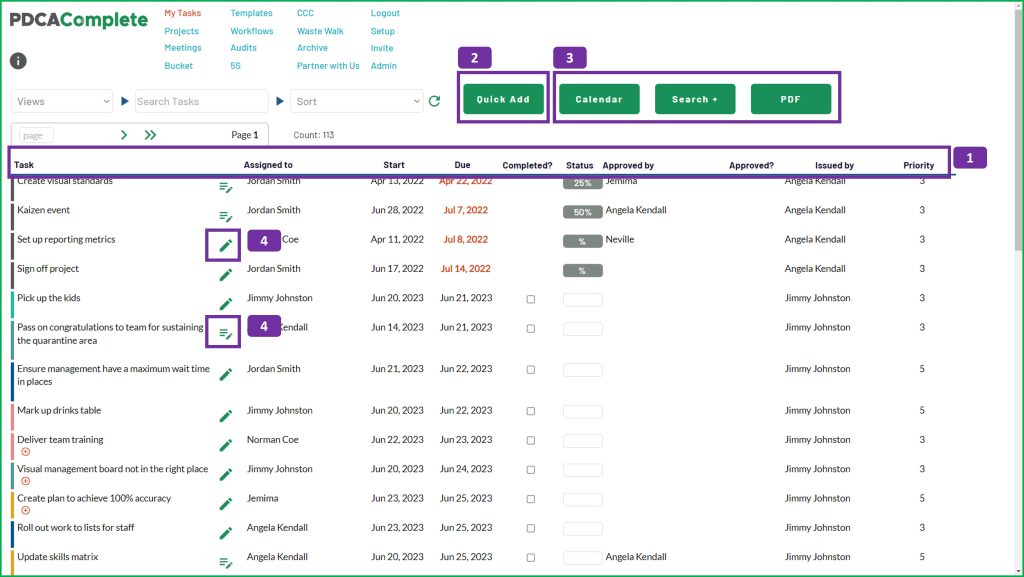
1. The headings on this screen are as follows:
- Task: This is the summary text, describing the task to be completed.
- Assigned To: This is the person responsible for completing the task.
- Start: The planned start date for the task.
- Due: The planned completion date for the task.
- Completed?: This checkbox can be ticked when the task is complete. The box will not appear if you cannot complete the task. Only the person Assigned to and the Issued by can complete the task. If there is no Approve by, when the task is completed, the task is moved to Archive.
- Status: This is an editable field, to record the estimated percentage completion achieved. Only the person Assigned to and the Issued by can update the status..
- Approved by: If an approver has been added to the task this name will appear here. You don't need to have an approver for every task, but can be useful if you want to give your approval before agreeing that a task is truly complete.
- Approved?: This is the corresponding checkbox, for the approver's use. Only the Approve by and the Issued by can approve the task. The box will not appear if you cannot approve the task. A task cannot be approved until it is completed. Once the task is completed and approved, the task is removed from this list and sent to Archive.
- Priority: The defined priority for the task. These can be set when creating and editing the task.
Notes:
By clicking on the row, the task will be highlighted green, useful when reviewing multiple items on the screen or re-sorting later.
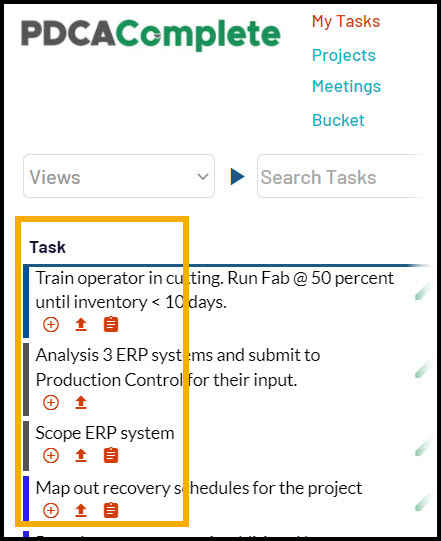
Red badge icons will appear under the tasks, as shown in the image below. These indicate new additions (plus in a circle), notes added (clipboard) and updates (up arrow). These will change dynamically whilst using PDCA Complete.
2. To create a new task, without it being linked to a meeting, project etc... click on this button. A pop up window will appear as shown later on this page.
3. By clicking on the Calendar button, the items shown on the screen will appear on a pop up calendar. The items can be filtered (see next image), which adjusts what is shown on the calendar itself. The calendar is color coded for each task per the bar to the right of the task. See below for explanation of the colors.
Clicking on the Search+ button will bring up an advanced search box, to help you refine you views on this screen.
The PDF button will allow you to generate a printable version of the data on the screen. Please note that this is only available with a paid subscription.
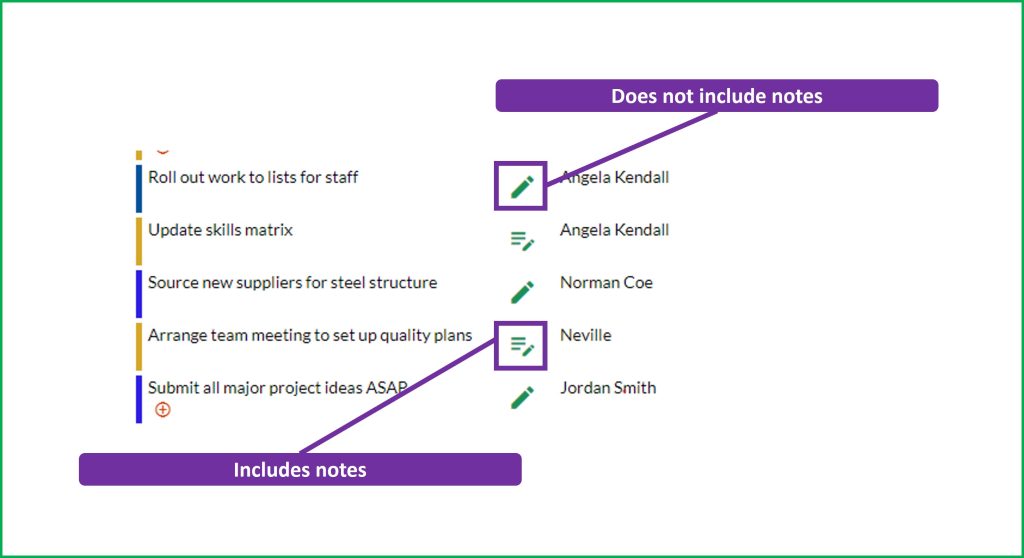
4. This is the task edit icon, a fuller explanation is shown at step 9 on this page. For now, please note that this icon will change if there are notes against it:
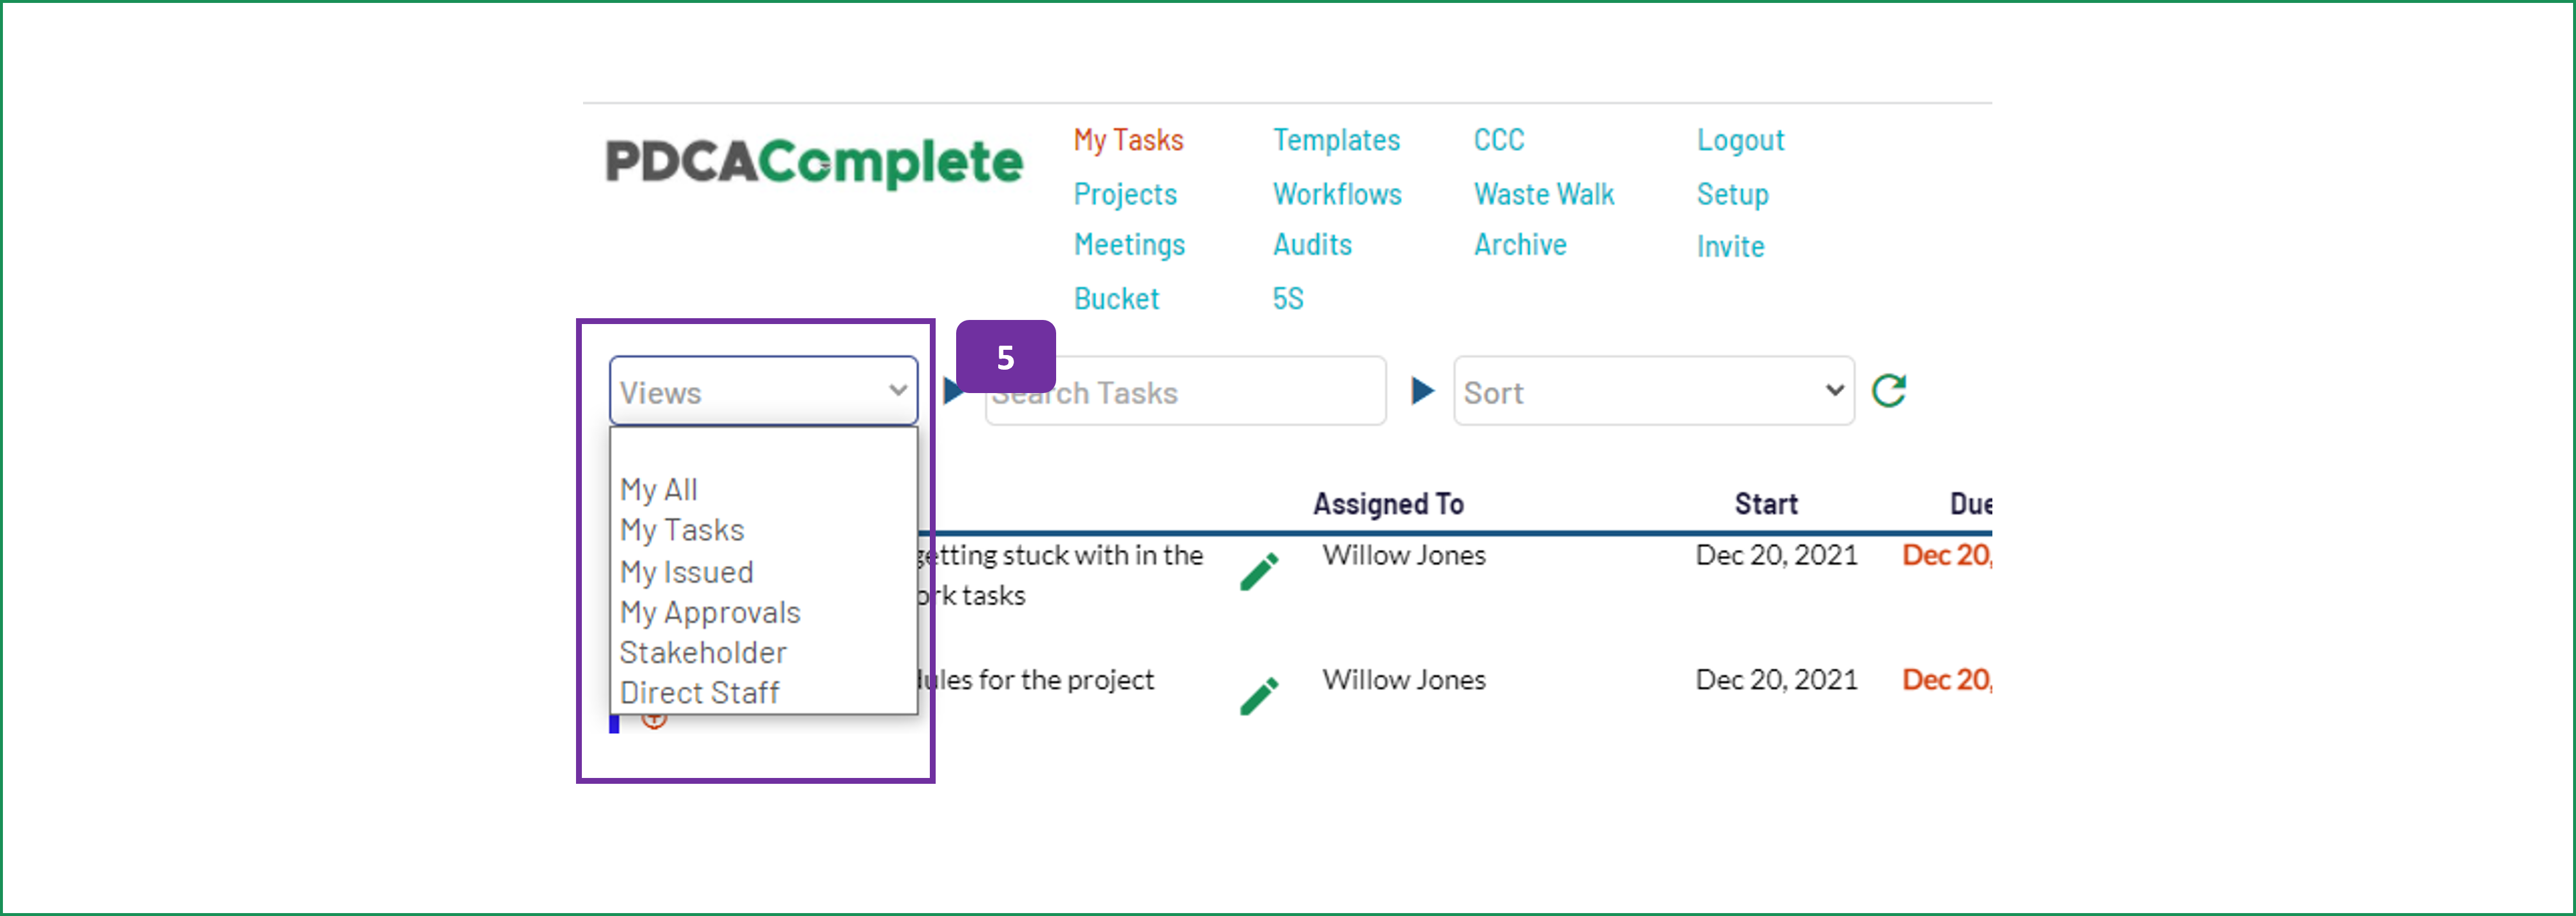
5. Adjusting the views on My Tasks is simply done using this drop down.
The options are as follows:
- My All: This is the default view for the screen and shows you all of the tasks related to you. The following views are sub-sets of this view. This list show your Assign, Approve, and Stakeholder tasks.
- My Tasks: These are the tasks assigned to you for completion.
- My Issued: These are the tasks that you have issued to other team members.
- My Approvals: This shows a list of the tasks that you have been requested to approve.
- Stakeholder: Any task that you have been attached to as a stakeholder is shown with this filter.
- Direct Staff: If you have team members allocated to you in the setup screen, you will be able to view these tasks when you select this option.
These filters allow you to quickly view the tasks in your organization so that you can be both effective and efficient with your time.
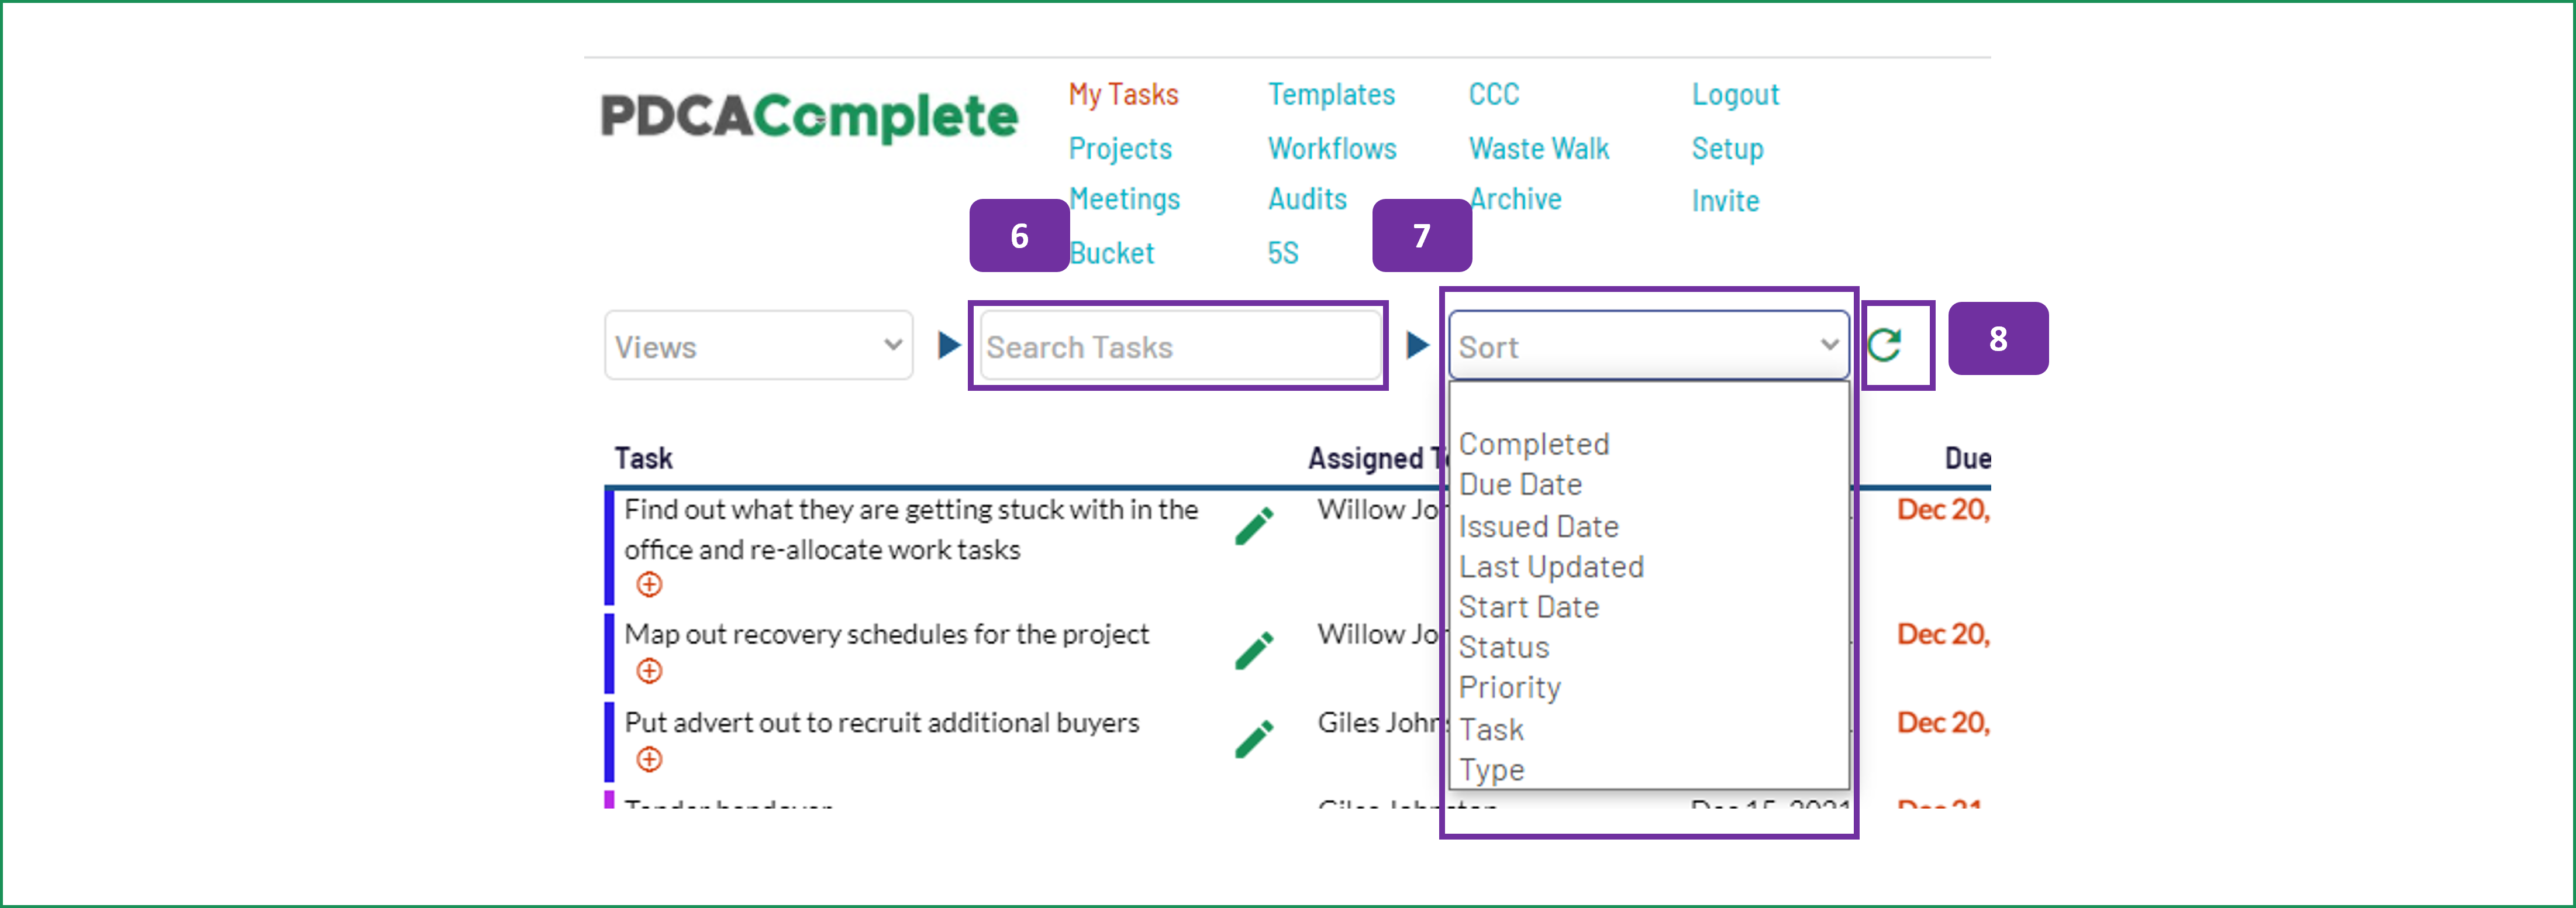
6. Tasks can be searched for using this search field. Pressing the tab key after typing in your search is the fastest way for the field to work. The tasks can then be further searched by typing in another parameter.
7. A number of sort options are available on this screen, to help you organize the information:
- Completed: This allows you to see the tasks that have been completed first (but are still on your screen due to further actions e.g. approval).
- Due Date: Puts the list into due date order, with oldest first.
- Issued Date: This changes the view so that the tasks that were issued first are at the top of the screen, with newest at the bottom.
- Last Updated: By using this sort, the most recently updated tasks will appear at the top of the screen.
- Start Date: The tasks that need to be started first will show at the top of the screen, when you select this sort option.
- Status: Sorting using status organizes the tasks by the status column, in descending order.
- Priority: If you have tasks with different priority values, they will be sorted, high to low, when using this option.
- Task: This re-arranges the view to show the tasks in alphabetical order.
- Type: This option changes the view a lists the tasks based on their origin in the system (e.g. quick add, project, meeting). The task types are displayed in alphabetical order.
8. This resets the view, search & sort parameters which lets you start your filter over.
Note - Items 5 View, 6 Search and 7 Sort work together as indicated by the arrows between the fields. For best results, complete them in order of 5 then 6 then 7.
Note - Some of these sort options will change the fields shown on the screen when selected.
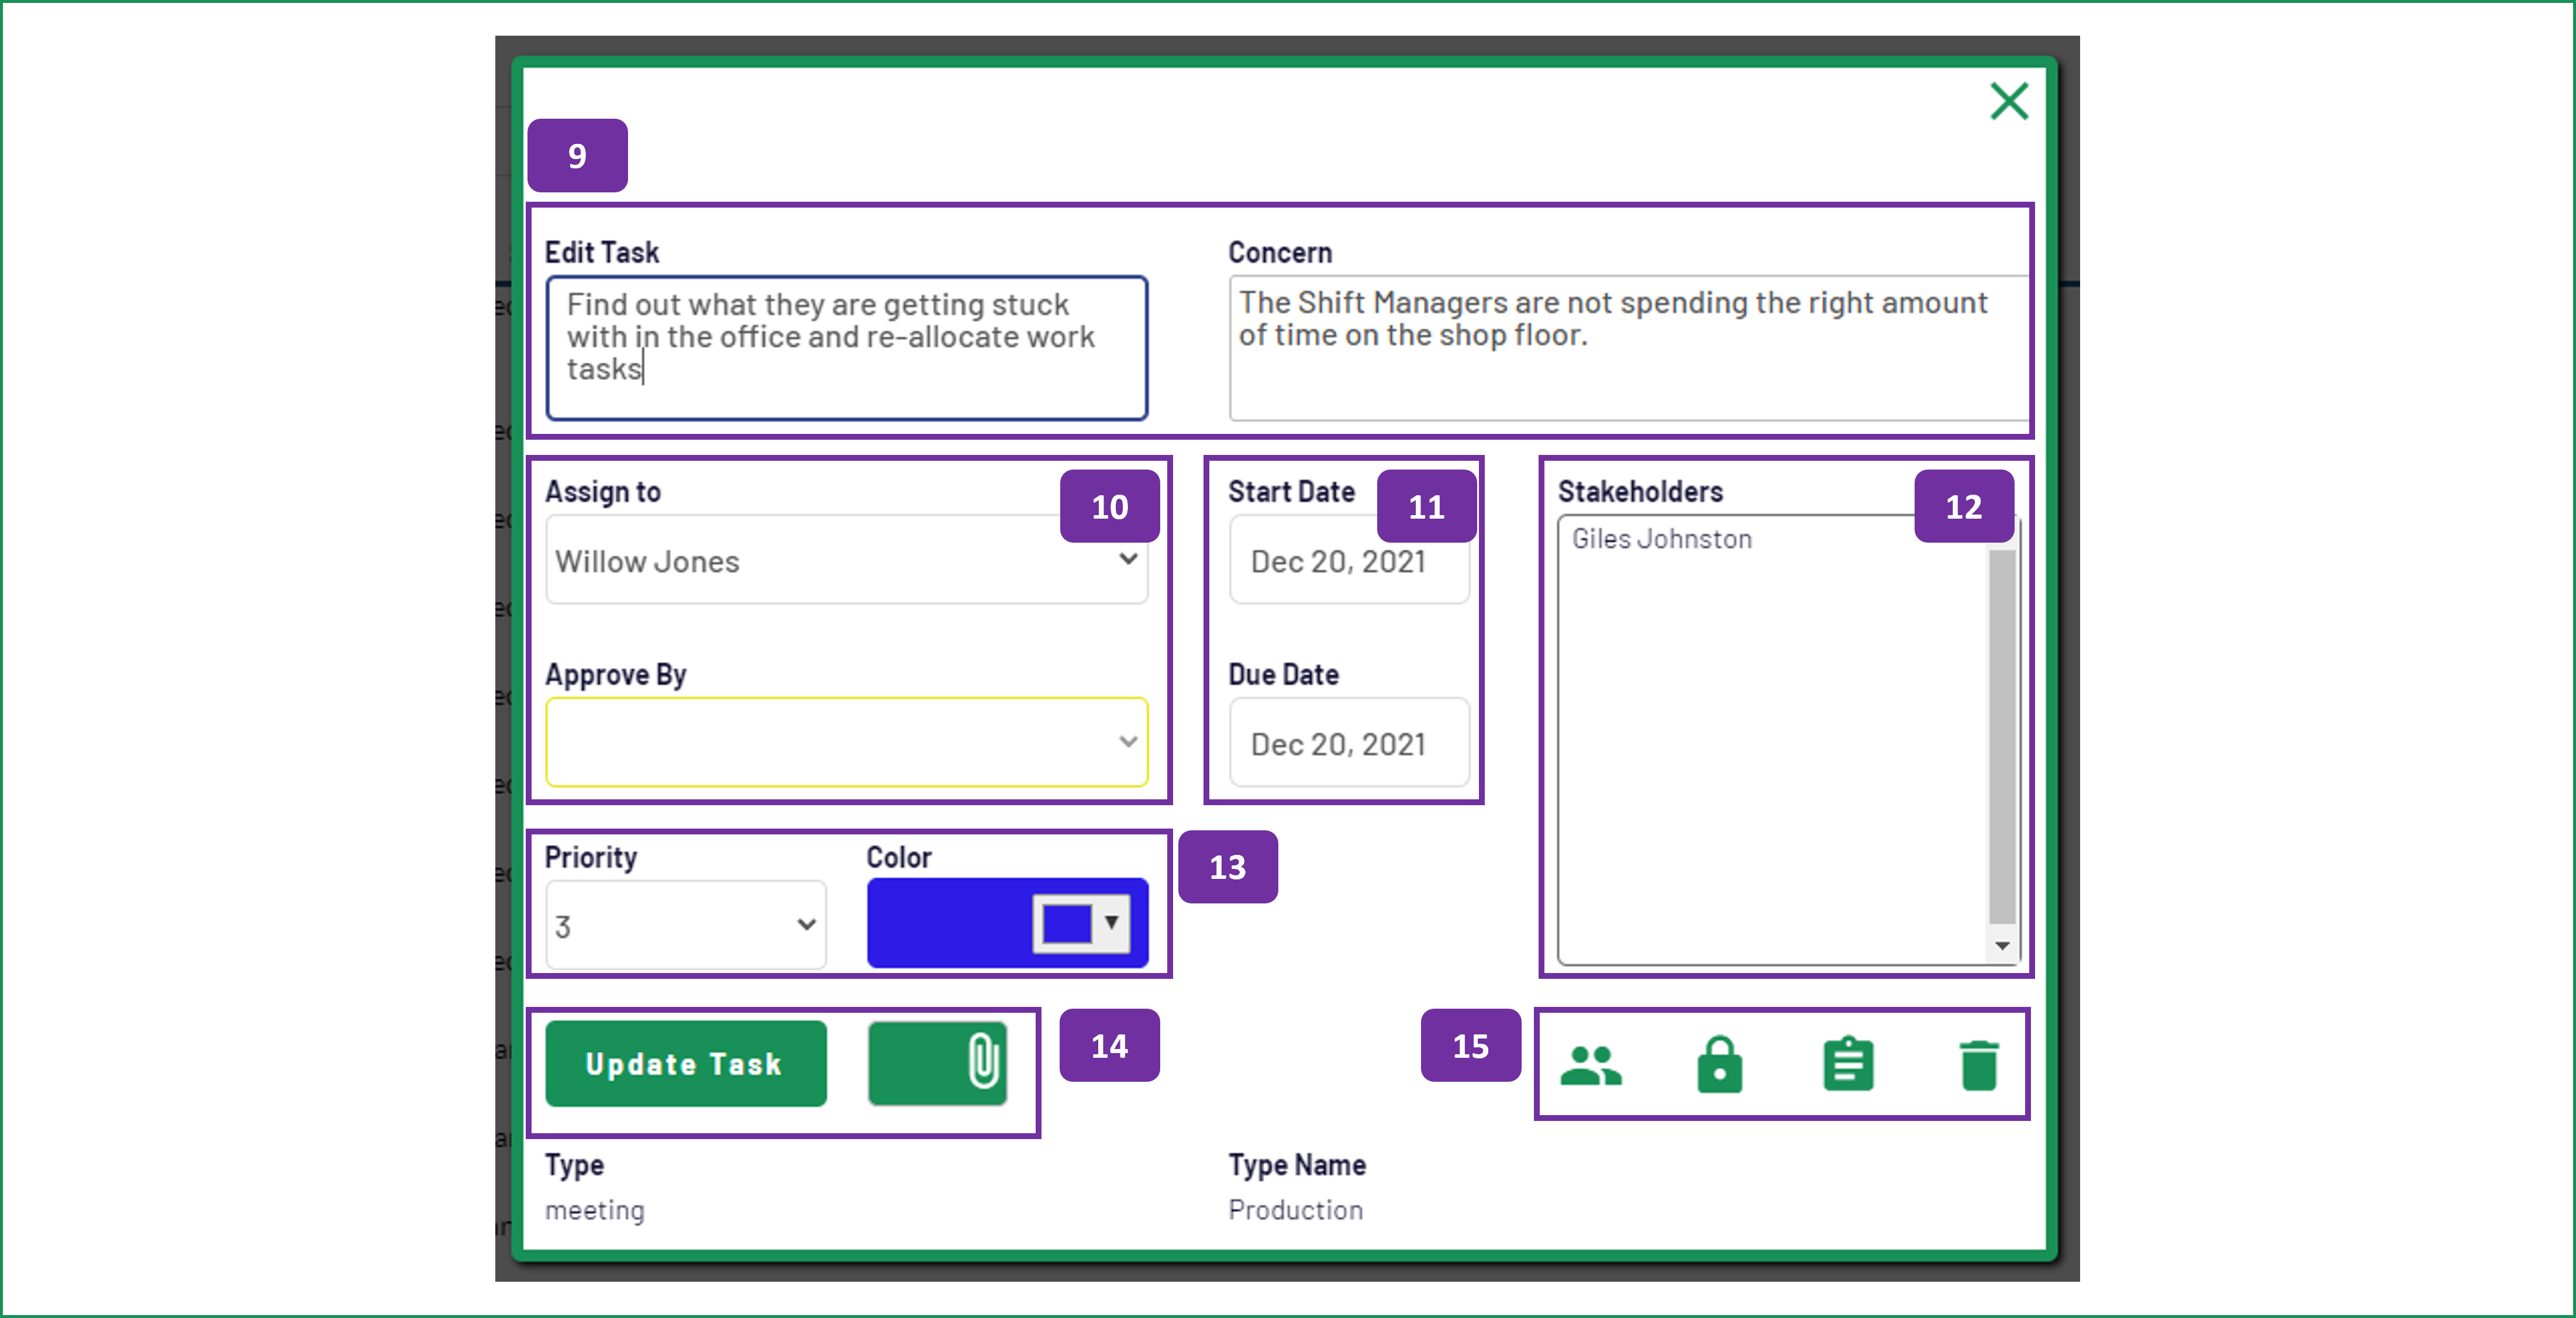
When you click on the edit task icon (4), or click on the Quick Add button (2), this screen will pop up. Only the Issuer of the Task can make changes to this screen.
9. Adding or editing the task description is carried out in the left hand side field, additional information can be added in the right hand field. Fields highlighted in red are mandatory. The field names may change, depending on what type of task you are editing.
10. Each task must have a team member assigned to it. The approver field is optional but really useful if you want to ensure a task has been checked by another team member before being deemed complete.
The team members that you can assign to and request approval from will be dependent upon your organization's setup.
11. Start and end dates need to be specified for each task. Clicking into these fields will bring up a calendar for you to select the dates.
12. If there are stakeholders associated with this task, they will be displayed in this area of the screen.
Stakeholders are other individuals who have a vested interest in this task. They may be others who support the task or need to be notified as the task is processed. Stakeholders can be anyone from the organization.
If you need to add / remove stakeholders see point 15. Stakeholders can be automatically updated regarding the progress of tasks by the Task Issuer.
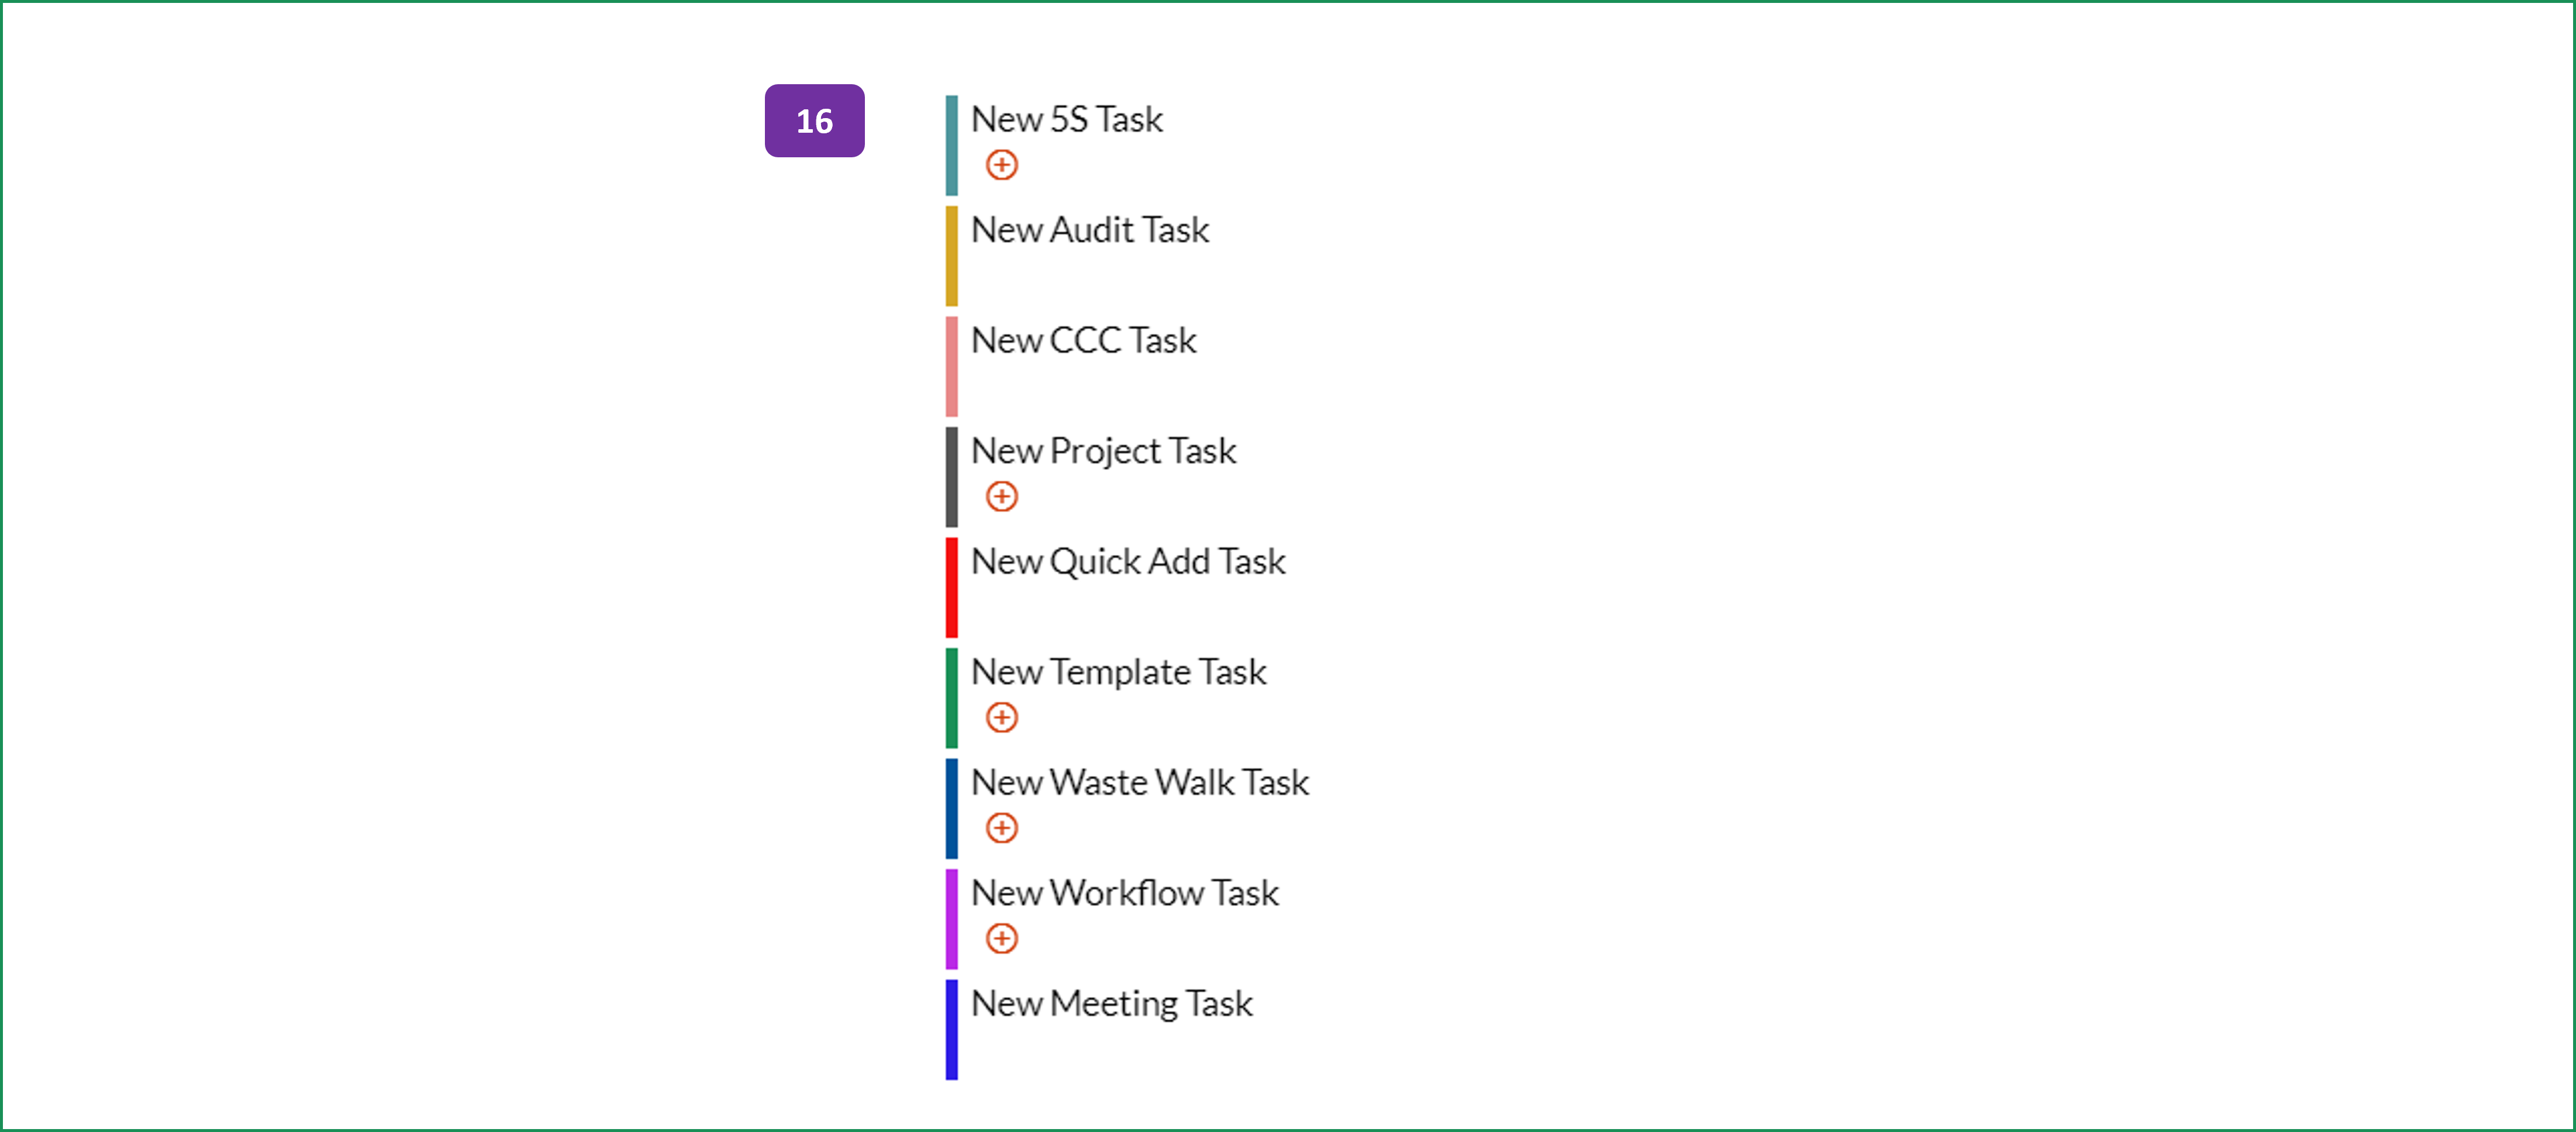
13. The priority of the task can be adjusted here, if required, 5 is high priority and 1 is low priority. The color of a task (shown by a left hand border on the main My Tasks screen) is defaulted by the type of task created (see point 16) but can be changed here if required.
14. Once all the changes have been made you can update the task. You will get the option to update all task members. If you choose 'yes' an automatic email will be sent to them.
In this area of the screen you also have the opportunity to attach a file* to the task (the button with the paperclip). The file size cannot be larger than 5 MB.
15. The final area of this screen gives you a few options:
- People icon: This allows you to edit the stakeholders for this task.
- Padlock icon: This can send the task into the system's archive.
- Note pad icon: If you need to add notes to your task, clicking on this icon opens up the notes page.
- Trash can icon: Use this icon to delete the task.
Notes:
You will only see the appropriate options, depending on who created the task.
You can exit this window by clicking outside of it or using the X icon in the top right hand corner.
*File attachments are for paid subscribers.
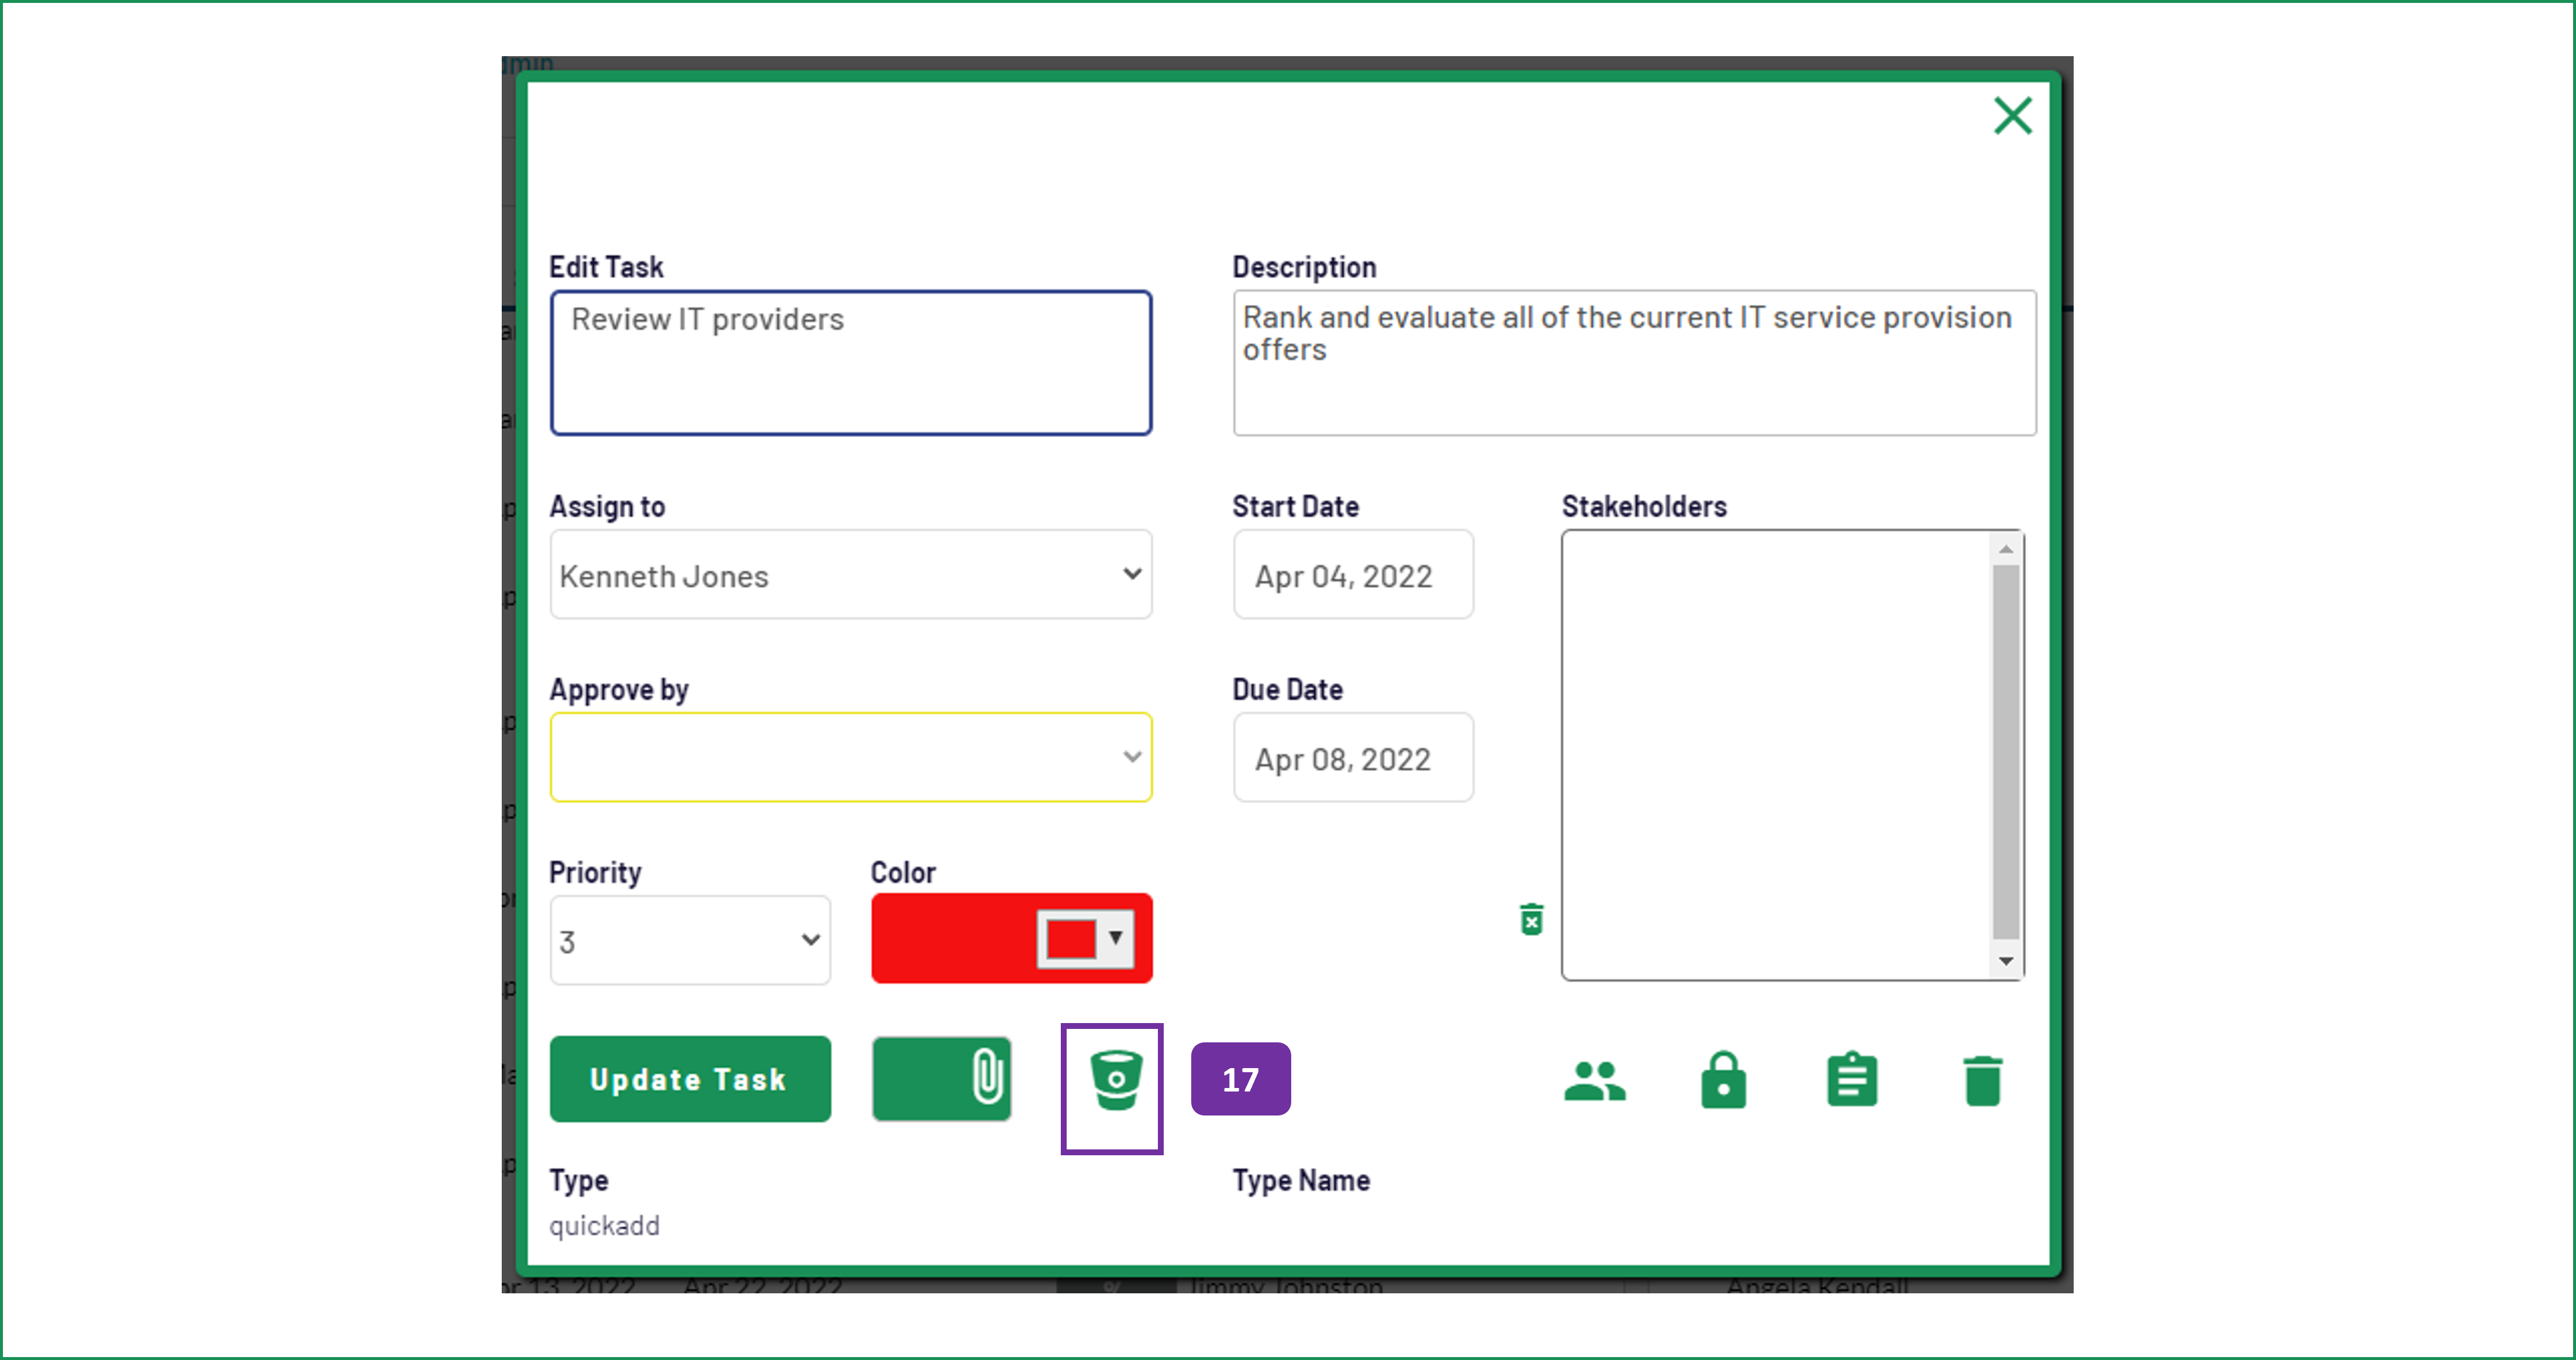
17. If you have tasks that you have added via the Quick Add function, that you just don't get around to, then you can add them into the Bucket list by clicking on the bucket icon.
This allows you to keep your list of tasks clean and allows you to compare the 'parked' tasks against your other opportunities. This helps to ensure that when you do get around to working on other tasks, you'll always be working on the most impactful activities you can.
